With Pabbly Connect, you can integrate Remo with all your favourite tools and applications! It's like an integration powerhouse.
So, let's get started with everything you need to know
Please note, the Pabbly Connect integration you will need the integrations add-on. Please contact our Success team for more information and details for how you can get this.- What is Pabbly Connect?
- Setup + Basic Details
- Trigger - New Event Created
- Trigger - New Event Registration
- Action - Invite Attendees to Event
- Action - Create Event
- Bonus Tips
What is Pabbly Connect?
First of all, what is Pabbly Connect...
Like Zapier, Pabbly Connect is an automation workflow tool. It works by helping you connect multiple applications to automate simple tasks using an if this happens (trigger), then do that (action) logic.
Pabbly Connect supports over 2000 applications, and we're thrilled to announce that Remo is now one of them! Remo currently supports 2 triggers and 2 actions:
| Trigger/Action | Name | Possible Use Case* |
|---|---|---|
| Trigger | New Event Created | When a new Remo event is created, add the event link to your website |
| Trigger | New Event Registration | When a user registers for your event, send them a personalized confirmation email |
| Action | Invite User to Event | Collect attendee interest in an event and then add those users to your event guest list and send them an official invitation |
| Action | Create New Event | When a meeting is booked, create a Remo event for the scheduled meeting time automatically |
*these are just examples of use cases, you can use the triggers and actions however you want to create workflows that make sense for your business and needs
Setup + Basic Details
In order to use the Remo and Pabbly Connect integration, you will need the following:
- Remo Account (with the Integrations add-on*)
- Pabbly Connect Account
*To use this integration, your account must have the integrations add-on (please contact our Success team for more information on this) Once you have both of those, you're all set!
1. Log in to your Pabbly Connect account
2. Click on "Create Workflow" and enter a name for your workflow

3. This is where you can build your workflow – add your trigger and action app (one of which will be Remo), set up the events, and specify the data you want to transfer.
Since each trigger/action has slightly different steps, we'll go into the specific steps for each. If you've got a particular trigger/action event you wish to use, simply click on it below to jump to that section:
- Trigger - New Event Created
- Trigger - New Event Registration
- Action - Invite Attendees to Event
- Action - Create Event
Trigger - New Event Created
This trigger listens for any time a new event is created on your Remo account and then sends the information of your new event to your chosen application.
In other words, it will help you automate a task like: When a new event is created on my Remo account, then do this [enter your desired action]........
1. In your Pabbly Connect Workflow, under Trigger > Choose App > Select "Remo Conference"

2. Select "New Event Created" as the Trigger Event
3. Click "Connect" - this will begin the process of connecting your Remo Account to this Pabbly Connect workflow
4. If this is your first time integrating your Remo account to your Pabbly Connect account, select "Add New Connection" and give it a name. You'll also need to enter your Remo API App Token* here as well.
*How do I get my Remo API App Token?
- Log in to your Remo account
- Click on your avatar in the upper right corner and click "Organization Settings"
- Go to "Third-party Integrations"
- Click "Generate" and then "Copy" (if you have already generated an App Token, you can click "Copy" directly)
If you have already integrated your Remo account to your Pabbly Connect account (this could be done from another Pabbly workflow including Remo as well), click "Select Existing Connection" and select your Remo account.
5. Click "Save" and you have successfully connected Remo and Pabbly! You should now see Connected
6. Next, click "Save & Send Test Request". This should change to a Waiting for Response message - this just means it's waiting for you to create a test event in your Remo account
7. Go to your Remo account and create a test event (click here for information on how to create an event)
8. Once you've created the Remo event, go back to your Pabbly Connect workflow and you should see a Response Received with all the data of the event you just created

It can take a few minutes to receive the data, so don't be alarmed if you don't see the response right away. If you don't see it after 2-3 minutes, please contact our Support team.9. That's your Remo trigger all set up! ✨ Now you can choose which application to send that data too (or more precisely what action to take when a new event is created).
TOP TIP: You can use the data sent about your newly created event as inputs for your action event (e.g. set the Remo event URL as your event location in a Google Calendar event)
Some potential use cases:
- Google Sheets - List all events created as a row in a Google Sheet
- Google Calendar - Create a calendar event when a new event is created
- Wordpress - Create a new post detailing information about your new event
Trigger - New Event Registration
This trigger listens for any time a user registers for any of your events and then sends the information of that user (and the event) to your chosen application.
In other words, it will help you automate a task like: When a user registers for my event, then do this [enter your desired action]....
1. In your Pabbly Connect Workflow, under Trigger > Choose App > Select "Remo Conference"
2. Select "New Event Registration" as the Trigger Event
3. Click "Connect" - this will begin the process of connecting your Remo Account to this Pabbly Connect workflow
4. If this is your first time integrating your Remo account to your Pabbly Connect account, select "Add New Connection" and give it a name. You'll also need to enter your Remo API App Token* here as well.
*How do I get my Remo API App Token?
- Log in to your Remo account
- Click on your avatar in the upper right corner and click "Organization Settings"
- Go to "Third-party Integrations"
- Click "Generate" and then "Copy" (if you have already generated an App Token, you can click "Copy" directly)
If you have already integrated your Remo account to your Pabbly Connect account (this could be done from another Pabbly workflow including Remo as well), click "Select Existing Connection" and select your Remo account.
5. Click "Save" and you have successfully connected Remo and Pabbly! You should now see Connected
6. Next, click "Save & Send Test Request". This should change to a Waiting for Response message - this just means it's waiting for you to register for your event (as a test user)
7. Register for your event as if you were a guest (i.e. use a different email address to your regular Remo account) - for information on how to register for a Remo event, please click here
8. Once you've registered successfully, go back to your Pabbly Connect workflow and you should see a Response Received with all the data of the user you just registered

It can take a few minutes to receive the data, so don't be alarmed if you don't see the response right away. If you don't see it after 2-3 minutes, please contact our Support team.9. That's your Remo trigger all set up! ✨ Now you can choose which application to send that data too (or more precisely what action to take when a user registers for your event).
TOP TIP: You can use the data sent about your registered user as inputs for your action event (e.g. set the recipient address in an email to the registered user's email address)
Some potential use cases:
- Gmail - Send a personalized confirmation or reminder email to registered users
- Hubspot - Create a contact for the registered user
- Slack - Send real-time notifications when a user registers for your event
Action - Invite Attendees to Event
This action will add a user to your event's guest list and send them an email invite whenever the trigger step is completed successfully.
In other words, it will help you automate a task like: When this [enter your desired trigger] happens, then add this user to my event's guest list and send them an email invite
1. In your Pabbly Connect Workflow, under Trigger > Choose App > Select your trigger app and event (or precisely what you want to happen that will trigger a user to be invited to your event).
2. Follow the on-screen instructions of your chosen app to get a sample trigger response.
For our example, we've used Google Forms as the trigger app, and New Response Received as the trigger event:

3. Let's move onto the next step in your workflow – Under Action > Choose App > Select "Remo Conference"

4. Select "Invite Attendees to Event" as the Action Event
3. Click "Connect" - this will begin the process of connecting your Remo Account to this Pabbly Connect workflow
4. If this is your first time integrating your Remo account to your Pabbly Connect account, select "Add New Connection" and give it a name. You'll also need to enter your Remo API App Token* here as well.
*How do I get my Remo API App Token?
- Log in to your Remo account
- Click on your avatar in the upper right corner and click "Organization Settings"
- Go to "Third-party Integrations"
- Click "Generate" and then "Copy" (if you have already generated an App Token, you can click "Copy" directly)
If you have already integrated your Remo account to your Pabbly Connect account (this could be done from another Pabbly workflow including Remo as well), click "Select Existing Connection" and select your Remo account.
5. Click "Save" and you have successfully connected Remo and Pabbly! You should now see Connected

6. Under Event ID > Enter the Remo Event ID* of the event you wish to add users to the guest list of
*How do I get my Remo Event ID?
- Log in to your Remo account and go to your My Events dashboard
- Head to your event's Event Settings (click the pencil icon on the event card)
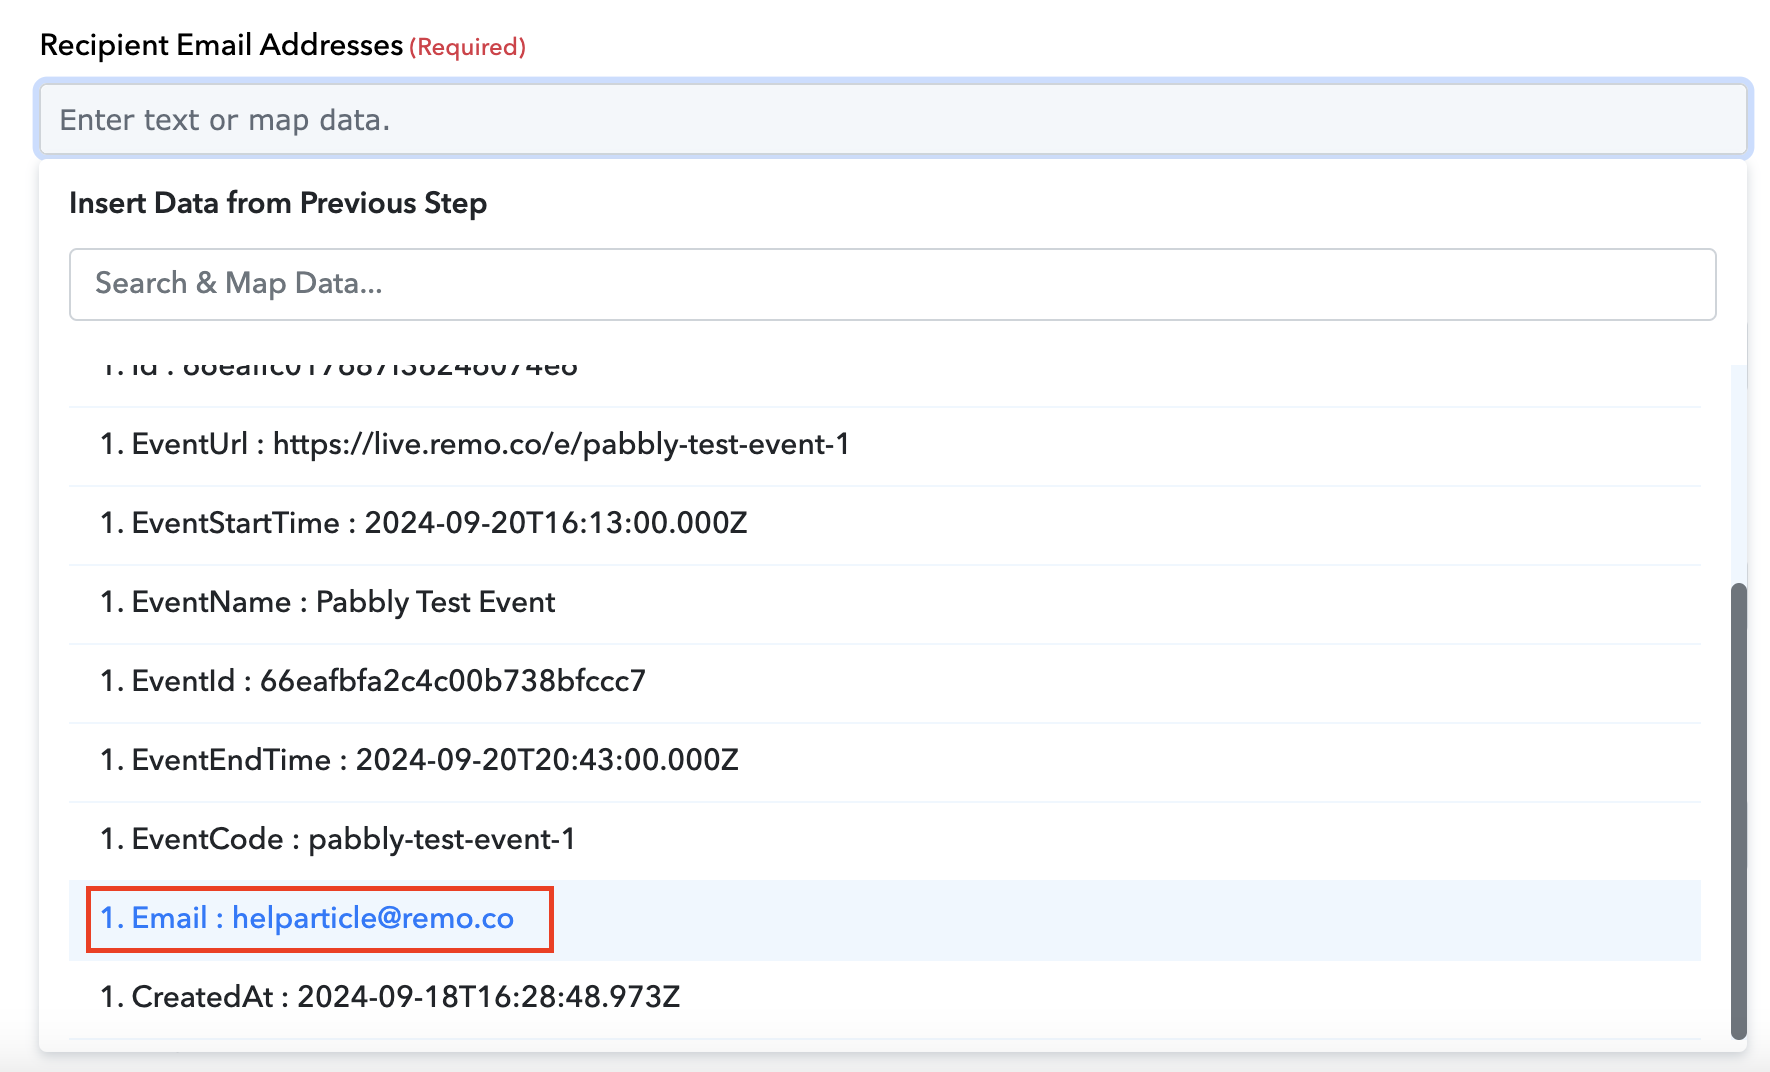
- In the URL, copy the string of numbers you see after "/settings/" (e.g. if this is the URL: https://live.remo.co/event/settings/66eafbfa2c4c00b738bfccc7 --> the Event ID is: 66eafbfa2c4c00b738bfccc7)7. Click the Email Address text box > Click your trigger app + event > Select the email address field from all the input data you receive from your trigger event

8. Click "Save & Send Test Request" - this will test your workflow by executing the action step with your test data (i.e. it will add the test user's email address to the specified Remo event's guest list)
9. Once that is done, you should see a Successful response received, like in the image below:

More importantly, you can check by checking your event's guest list in Remo directly. You should be able to see the test user has been added to your guest list AND an invite email has been sent to the user (if email invites are enabled for your event)

IMPORTANT: Please note, this action is only adding users to the event's guest list (and sending an invite email). It does not mean the user is registered for your event yet - they would either need to register directly on the Remo landing page prior to your event (if you require exact registration timestamps) -or- at the event start time they can simply join and register at the same time.Some potential use cases:
- Google Forms - Collect attendee interest for an event from a Google Form and invite those interested to your event
- Facebook Lead Ads - When a new lead is created, invite the user to your event
- Remo! - When a new event is created automatically (i.e. through our Pabbly action), add a user to the guest list automatically as well
Action - Create Event
This action will create a new event in your Remo account whenever the trigger step is completed successfully.
In other words, it will help you automate a task like: When this [enter your desired trigger] happens, then create a new Remo event
1. In your Pabbly Connect Workflow, under Trigger > Choose App > Select your trigger app and event (or precisely what you want to happen that will trigger a new event to be created).
2. Follow the on-screen instructions of your chosen app to get a sample trigger response.
For our example, we've used Calendly as the trigger app, and Invitee Created (user) as the trigger event:

3. Let's move onto the next step in your workflow – Under Action > Choose App > Select "Remo Conference"
4. Select "Create Event" as the Action Event
3. Click "Connect" - this will begin the process of connecting your Remo Account to this Pabbly Connect workflow
4. If this is your first time integrating your Remo account to your Pabbly Connect account, select "Add New Connection" and give it a name. You'll also need to enter your Remo API App Token* here as well.
*How do I get my Remo API App Token?
- Log in to your Remo account
- Click on your avatar in the upper right corner and click "Organization Settings"
- Go to "Third-party Integrations"
- Click "Generate" and then "Copy" (if you have already generated an App Token, you can click "Copy" directly)
If you have already integrated your Remo account to your Pabbly Connect account (this could be done from another Pabbly workflow including Remo as well), click "Select Existing Connection" and select your Remo account.
5. Click "Save" and you have successfully connected Remo and Pabbly! You should now see Connected
6. Under Event Name, you can either:
- add a static name for your event (meaning whenever this workflow is triggered, it will always create an event with that same name)

- you can add a dynamic name for your event by selecting one of the input fields from your trigger event (meaning whenever this workflow is triggered, it will name the event it creates after some data it receives)

- you can add a mix of both!

7. Repeat the above steps to set your event's start and end time in their respective fields
NOTE: For Event Start and End Time, be careful about using static times, unless your plan allows for unlimited simultaneous events (as with static times, you can easily end up with multiple simultaneous events created)8. Click "Save & Send Test Request" - this will test your workflow by executing the action step with your test data (i.e. it will add the test user's email address to the specified Remo event's guest list)
9. Once that is done, you should see a Successful response received, like in the image below:

For this action step, we will also supplement the response with details about the event created (e.g. the event ID or event URL), so you can use this as input data for another action stepMore importantly, you can check by going to your Remo account and seeing if the event has been successfully created (you may need to refresh your page)

Some potential use cases:
- Calendly - When someone books a meeting, create a Remo event for the meeting at that scheduled time
- Google Calendar - When a new event is scheduled/meeting is booked, create a Remo event for the event/meeting
- Eventbrite - When a new event is listed, create a corresponding Remo event
Bonus Tips
Here's a few extra tips when using the Remo and Pabbly Connect integration:
- You can connect several apps within one workflow to automate more complex tasks as well. For example:
- Example 1: When a new meeting is booked through Calendly (trigger), create a Remo event for the meeting (action 1), then add the meeting invitee as a user to the Remo event's guest list (action 2)
- Example 2: When a user registers for an event (trigger), add the registered user as a contact to Hubspot (action 1), delay for 3 days (Pabbly action), then send a reminder email to the registered user (action 2)
- Pabbly Connect offers a series of in-built actions to help you create complex automations/workflows, like:
- Delay (Pabbly) - this adds a delay within your workflow
- Filter (Pabbly) - this adds a filter within your workflow, so you can specify only if certain conditions are met continue the workflow, otherwise stop
- Router (Pabbly) - this lets you set up a conditional workflow, so if condition 1 is met do action 1, if condition 2 is met do action 2 instead
- And more!
Got any more tips? Send them in and we'll add them to our list!